这次学校短学期的课题是利用dht11与树莓派做一个温湿度监控平台,要求能实现实时显示,查询历史,定时浇灌,报警等功能。
硬件
dht11是一款有已校准数字信号输出的温湿度传感器。 其精度湿度+-5%RH, 温度+-2°C,量程湿度20-90%RH, 温度0~50°C。
首先我们要从dht11上读出温湿度,dht11分别有3个引脚,分别为VCC、GND和DOUT,DOUT为数据输出的引脚。
树莓派引脚图

我们将DOUT接在物理引脚7脚上,代码如下
因为我们选了BCM模式,所以代码中的引脚编号是4
 1
 2
 3
 4
 5
 6
 7
 8
 9
10
11
12
13
14
15
16
17
18
19
20
21
22
23
24
25
26
27
28
29
30
31
32
33
34
35
36
37
38
39
40
41
42
43
44
45
46
47
48
49
50
51
52
53
54
55
56
57
58
59
60
61
62
63
64
65
66
67
68
69
70
|
# dht11.py
import time
import RPi.GPIO as GPIO


def calTemp():
    channel = 4
    data = []
    j = 0

    GPIO.setmode(GPIO.BCM)

    time.sleep(1)

    GPIO.setup(channel, GPIO.OUT)
    GPIO.output(channel, GPIO.LOW)
    time.sleep(0.02)
    GPIO.output(channel, GPIO.HIGH)
    GPIO.setup(channel, GPIO.IN)

    while GPIO.input(channel) == GPIO.LOW:
        continue
    while GPIO.input(channel) == GPIO.HIGH:
        continue

    while j < 40:
        k = 0
        while GPIO.input(channel) == GPIO.LOW:
            continue
        while GPIO.input(channel) == GPIO.HIGH:
            k += 1
            if k > 100:
                break
        if k < 8:
            data.append(0)
        else:
            data.append(1)

        j += 1

    humidity_bit = data[0:8]
    humidity_point_bit = data[8:16]
    temperature_bit = data[16:24]
    temperature_point_bit = data[24:32]
    check_bit = data[32:40]

    humidity = 0
    humidity_point = 0
    temperature = 0
    temperature_point = 0
    check = 0

    for i in range(8):
        humidity += humidity_bit[i] * 2 ** (7 - i)
        humidity_point += humidity_point_bit[i] * 2 ** (7 - i)
        temperature += temperature_bit[i] * 2 ** (7 - i)
        temperature_point += temperature_point_bit[i] * 2 ** (7 - i)
        check += check_bit[i] * 2 ** (7 - i)

    tmp = humidity + humidity_point + temperature + temperature_point

    if check == tmp:
        # print "temperature :", temperature, "*C, humidity :", humidity, "%"
		    return {'datetime':int(time.time()),'temperature' : temperature,'humidity' :humidity,}
    else:
        # print "wrong"
        # print "temperature :", temperature, "*C, humidity :", humidity, "% check :", check, ", tmp :", tmp
		    return {'datetime':int(time.time()),'temperature' : temperature,'humidity' :humidity,'error':1}

    GPIO.cleanup()
|
软件
好了,温度读取完成了,该思考怎么把数据反馈到网页上了,老师建议我们用Flask来做,并给了我们一份材料。材料中给的范例是在拿到温湿度数据后,利用render_template,把数据传进网页,如下。
1
2
3
4
5
6
7
8
|
@app.route("/")
def hello():
    templateData=dht11();
    templateData={
    	'temperature' : 23,
    	'humidity' :30,
    }
    return render_template("index.html", **templateData)
|
这时我想,既然都用到Flask了,为何不能做一下前后端分离呢?
后端
上网查了一下利用Flask架设后端服务器的相关知识,写了一个获取温湿度数据的接口。
1
2
3
4
|
@app.route("/getData", methods=['GET'])
def home():
    response=dht11.calTemp()
    return jsonify(response)
|
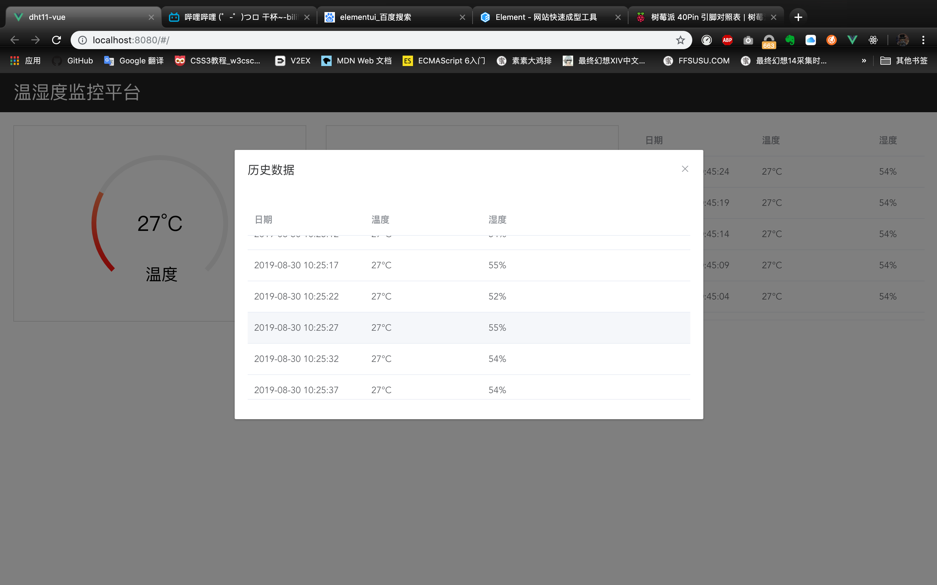
历史查询功能,乍一想可能需要上个数据库,但无奈技艺不精,选择了将数据保存在json文件中去进行反复的读写。
同时新增了一个历史查询的接口。
 1
 2
 3
 4
 5
 6
 7
 8
 9
10
11
12
13
14
15
16
17
18
19
20
21
|
@app.route("/getData", methods=['GET'])
def home():
    list=[]
    response=dht11.calTemp()
    with open("./data.json",'r+') as f:
        if os.path.getsize('./data.json')==0:
            list.append(response)
            json.dump(list,f)
        else:
            list=json.load(f)
            list.append(response)
            f.seek(0)
            f.truncate()
            json.dump(list,f)
    return jsonify(response)

@app.route("/getHistory", methods=['GET'])
def history():
    with open("./data.json",'r+') as f:
        res=json.load(f)
    return jsonify(res)
|
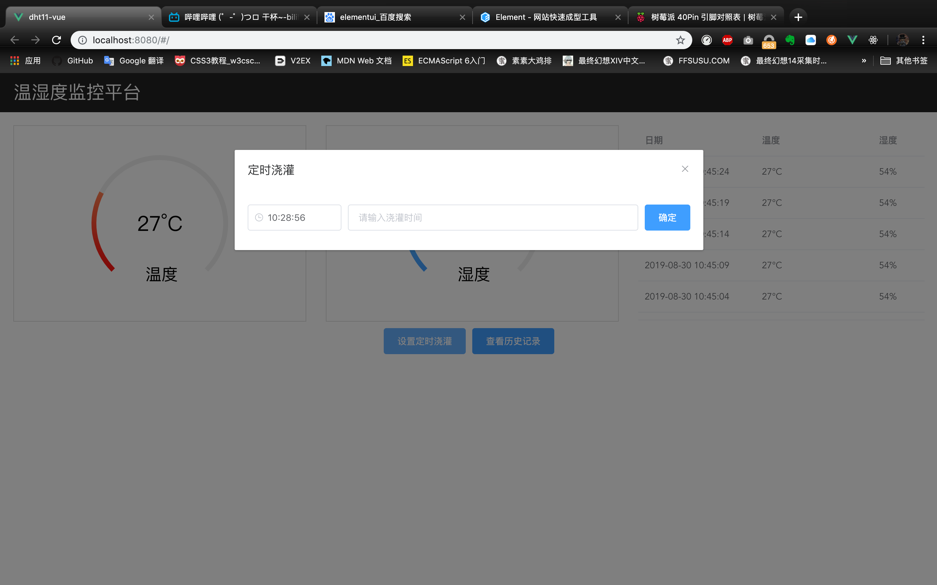
还有一个定时浇灌的功能,我们用led灯去模拟浇灌系统,由前端传一个时间戳和浇灌时间,然后进入一个死循环,去判断设定时间和当前时间是否相等,再进行浇灌。
这里涉及到一个问题,进入死循环后,其他操作无法进行,整个程序会卡死在这一步直到到达预定的时间,一开始以为可以用多线程来解决,就去看了一下thread,后来操作了一下发现还是无解。之后经老师指点,建议我使用多进程试一试,便用了multiprocessing实现多进程,可以在进入死循环的同时,其余功能也正常运行。
之后这里还有一个小问题,传回来的时间戳和python自己获取当前时间的时间戳貌似很难相等,猜测应该是程序本身运行也需要时间,无法做到如此精确,便更改了一下设计思路,前端传回设定时间和当前时间的时间差,然后进入程序后先sleep,再运行。
具体代码如下
 1
 2
 3
 4
 5
 6
 7
 8
 9
10
11
12
|
@app.route("/lightLed",methods=['GET'])
def light():
    sleepTime=request.args.get("sleepTime")
    lightTime=request.args.get("lightTime")
    p=multiprocessing.Process(target=led.lightLED,args=(sleepTime,lightTime,))
    p.start()
    response={
        'light':'true',
        'sleeptime':sleepTime,
        'lighttime':lightTime,
    }
    return jsonify(response)
|
 1
 2
 3
 4
 5
 6
 7
 8
 9
10
11
12
13
|
# led.py
import time
import RPi.GPIO as GPIO

def lightLED(sleepTime,lightTime):
    GPIO.setmode(GPIO.BCM)
    time.sleep(float(sleepTime)
    GPIO.setup(27, GPIO.OUT)
    GPIO.output(27, GPIO.HIGH)
    time.sleep(float(lightTime))
    GPIO.output(27, GPIO.LOW)
    time.sleep(1)
    GPIO.cleanup()
|
整个后端代码如下
 1
 2
 3
 4
 5
 6
 7
 8
 9
10
11
12
13
14
15
16
17
18
19
20
21
22
23
24
25
26
27
28
29
30
31
32
33
34
35
36
37
38
39
40
41
42
43
44
45
46
47
48
49
50
51
52
|
from flask import Flask, render_template, jsonify, request
from flask_cors import CORS
import datetime
import dht11
import led
import json
import time
import os
import multiprocessing
app = Flask(__name__)
CORS(app, resources={r"/getData": {"origins": "*"}})
CORS(app, resources={r"/lightLed": {"origins": "*"}})
CORS(app, resources={r"/getHistory": {"origins": "*"}})

@app.route("/getData", methods=['GET'])
def home():
    list=[]
    response=dht11.calTemp()
    with open("./data.json",'r+') as f:
        if os.path.getsize('./data.json')==0:
            list.append(response)
            json.dump(list,f)
        else:
            list=json.load(f)
            list.append(response)
            f.seek(0)
            f.truncate()
            json.dump(list,f)
    return jsonify(response)

@app.route("/getHistory", methods=['GET'])
def history():
    with open("./data.json",'r+') as f:
        res=json.load(f)
    return jsonify(res)

@app.route("/lightLed",methods=['GET'])
def light():
    sleepTime=request.args.get("sleepTime")
    lightTime=request.args.get("lightTime")
    p=multiprocessing.Process(target=led.lightLED,args=(sleepTime,lightTime,))
    p.start()
    # led.lightLED(lightTime)
    response={
        'light':'true',
        'sleeptime':sleepTime,
        'lighttime':lightTime,
    }
    return jsonify(response)

if __name__ == '__main__':
    app.run(host='0.0.0.0',port=5000,threaded=True)
|
后端和前端运行在同一个路由器下,所以运行在0.0.0.0地址,这样前端可以直接用树莓派所在的ip访问到。
前端
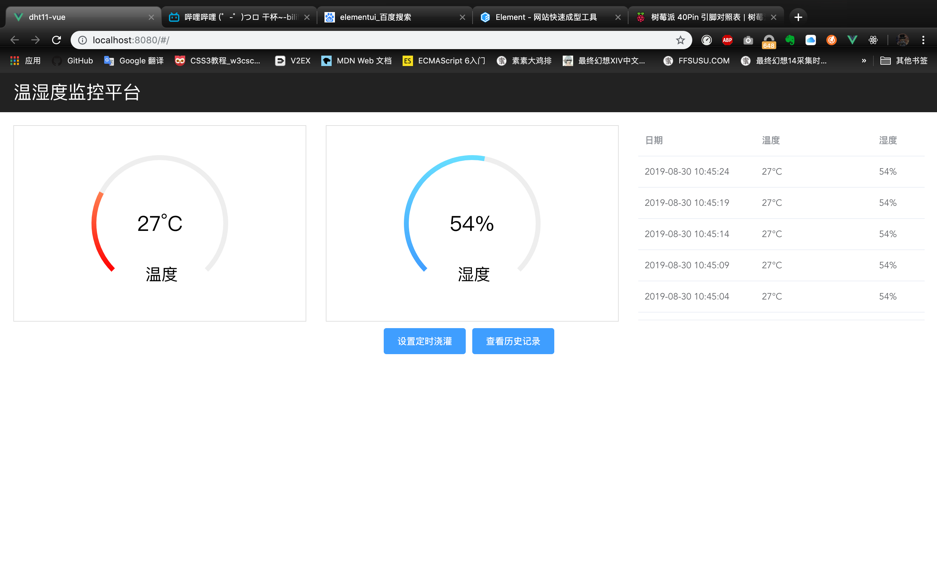
前端用了自己比较擅长的vue来写,界面如下
向后端请求数据的相关操作如下
 1
 2
 3
 4
 5
 6
 7
 8
 9
10
11
12
13
14
15
16
17
18
19
20
|
methods: {
  async getData() {
    let res = await this.$http.get('http://172.20.10.4:5000/getData');
    this.obj=res.body;
    // this.obj.data=this.obj.data*1000;
    this.tableData.unshift(res.body);
    this.tempOptions.series[0].data[0].value = res.body.temperature * 2.7;
    this.tempOptions.series[0].data[0].name = res.body.temperature + '°C';
    this.tempOptions.series[0].data[1].value = (100 - res.body.temperature) * 2.7;
    this.humiOptions.series[0].data[0].value = res.body.humidity * 2.7;
    this.humiOptions.series[0].data[0].name = res.body.humidity + '%';
    this.humiOptions.series[0].data[1].value = (100 - res.body.humidity) * 2.7;
  },
}
created() {
  this.timer = setInterval(this.getData, 5000);
},
beforeDestroy() {
  clearInterval(this.timer);
},
|
定时浇灌的函数
 1
 2
 3
 4
 5
 6
 7
 8
 9
10
11
12
13
14
15
16
|
async lightLed() {
  let now = new Date().getTime()
  let setTime = this.setTime.getTime();
  let sleepTime = (setTime-now)/1000;
  let lightTime = this.lightTime;
  await this.$http.get(`http://172.20.10.4:5000/lightLed?sleepTime=${sleepTime}&lightTime=${lightTime}`).then(res => {
    this.$message({
      message: '成功发送浇灌信息',
      type: 'success'
    });
    this.lightTime = '';
  },
  err => {
    this.$message.error('发送浇灌信息失败,请再次尝试');
  });
},
|
温湿度监控报警
 1
 2
 3
 4
 5
 6
 7
 8
 9
10
11
12
13
14
15
16
17
18
|
watch: {
  'obj': function(obj){
    if(obj.temperature>37){
      this.$notify({
        title: '警告',
        message: '温度过高!',
        type: 'warning'
      });
    };
    if(obj.humidity>70){
      this.$notify({
        title: '警告',
        message: '湿度过高!',
        type: 'warning'
      });
    }
  }
},
|
GitHub地址:
dht11-flask-vue